
Home » Archives for July 2016
Featured Posts
-
No matter what time of year, a warm bowl of Pho is always satisfying. Enjoy this gluten-free, plant-based version as a complete lunch or...
-
 3D stone blocks with nice effects will make anyone fascinated, even cause you could not bear to eat them. rong recently, sisters talk racin...
 -
 How to make pumpkin milk is easy, moreover this dish is also very tasty, nutritious, particularly effective for the body you have flavored a...
 -
Pretty small floating cakes, plump, pale and fragrant vegetarian cake are indispensable whenever the Cold Food Festival. Since long time...
-
 Because I made all these pizza at various times, you will see different pans and crusts. The Mediterranean one was delicious but mushy....
 -
Print Almond Poppy Seed Chicken Salad Sandwiches Yield: About 5 - 6 servings Ingredients Chicke...
-
I love that there is no cooking required with this recipe, (especially if you buy pre-cooked shrimp), which is so tempting when the tem...
-
A helpful infographic guide for moms about your baby’s weekly evolution alongside the changes taking place in your body during pregnancy. ...
-
 Steamed chicken with soy sauce is another dish quite simply bringing marinated chicken and steamed with soy sauce is a very attrac...
 -
 Bun cha noodle is one of the oldest favorites of north Vietnam cuisine. The ingenuity of the housewives will be expressed through a delic...
ROASTED GARLIC RECIPE
11:27 PM |Roasted Garlic Recipe

Years ago a friend of mine showed me how to roast garlic whole and eat the warm, toasty cloves right out of the head. How wonderfully simple! And perfect for garlic lovers.
Roasting garlic changes the chemical makeup of the garlic so that it’s easier to digest. You can eat a lot more garlic if it is completely cooked, with fewer side effects than you would get from eating raw garlic.
Eat the caramelized roasted cloves directly out of the heads, or add them to pasta dishes, mash them up and spread them over toast, or mix them with sour cream for a dip. If you are sensitive to raw garlic, you may find that you can much more easily eat roasted garlic.
Roasted Garlic Recipe
>> Ingredients
One or more whole heads of garlic.
>> Method
1. Preheat your oven to 400°F (205° C). (A toaster oven works great for this.)
2. Peel and discard the papery outer layers of the whole garlic bulb, leaving intact the skins of the individual cloves of garlic. Using a sharp knife, cut 1/4 to a 1/2 inch from the top of cloves, exposing the individual cloves of garlic.


3. Place the garlic heads in a baking pan, cut side up. (A muffin pan works great for this, as it keeps the garlic bulbs from rolling around.) Drizzle a couple teaspoons of olive oil over each exposed head, using your fingers to rub the olive oil over all the cut, exposed garlic cloves. Cover the bulb with aluminum foil. Bake at 400°F (205°C) for 30-35 minutes, or until the cloves feel soft when pressed.


Eat as is (I love straight roasted garlic) or mash with a fork and use for cooking. Can be spread over warm French bread, mixed with sour cream for a topping for baked potatoes, or mixed in with Parmesan and pasta.
Easy Stromboli
1:35 AM |Easy Stromboli

Y’all, I’m super excited to share this ridiculously easy and amazingly delicious recipe! I’ll admit the flavors even surprised me with this one.
I just love stromboli – the crispy crust, the gooey cheese! There’s a great local joint that makes my absolute favorite! But I’m not always in the mood to go out (or to spend that kind of money). Making this stromboli at home is so easy. The best part is you can customize it with your favorite toppings. In this version, I used pepperoni, Italian sausage, and cheese, but you could use nearly whatever you want – olives, ham, onions, peppers, mushrooms, etc, etc. Just keep in mind that the more you add, the longer the cook time will be and you risk the crust getting a bit soggy by adding too many veggies. Do what you wish, though… I’m just warning you.

It all starts with a can of this THIN CRUST pizza dough. It really needs to be the thin crust kind. Did I mention thin crust?

Line a large baking sheet with parchment. Yes, this is important because it’ll help you roll it up once everything’s on there. You can also use a silicone baking mat, if you have one. Then open the dough, unroll it, and stretch it thin.

Next, top it with the sauce. I recommend you leave about a 1/2 inch gap around the edges.

Top with pepperoni. See my little photobomber there…  He just loves helping me in the kitchen. He arranged all of that pepperoni on there all by himself. He told me to tell y’all that.
He just loves helping me in the kitchen. He arranged all of that pepperoni on there all by himself. He told me to tell y’all that. 
Next, add the sausage and whatever other toppings you might like.

Top with the cheese…

And roll it up. Start with one side and use the parchment to help you roll it over…

And over…

Then arrange it back in the center of your parchment with the seam side down. It doesn’t have to be pretty. Cut about 5 or 6 small slits in the top to let the steam out and to help get the crust cooked through. Then bake for 15 to 20 minutes or until deep golden brown. Serve hot with some extra pizza sauce for dipping! And there you have it! Y’all enjoy!

CREAMY GARLIC CHICKEN
3:44 AM |Creamy Garlic Chicken
Creamy Garlic Chicken – crazy delicious skillet chicken with creamy garlic sauce. Perfect with pasta and dinner is ready in 20 mins.

Happy June! I am counting down to our big trip back to Malaysia, 8 days from now precisely. I have a ton of things to do before then; one of the most important things is to use up all the ingredients I have accumulated in my fridge and pantry—a ton of garlic, lots of frozen chicken, leftover chicken broth, plain yogurt, half bottle of white wine, etc.

Sometimes, the most random ingredients pair so flawlessly together, and this is exactly how this amazing and absolutely scrumptious creamy garlic chicken was concocted. The recipe is inspired by this rustic chicken with garlic gravy recipe, but I used yogurt to make the creamy sauce.

For the chicken, I used skin-on chicken thighs, but I deboned the thighs. This will ensure that you get the best of the chicken thighs: moist, tender, crispy on the bottom but not dry, with skin and without bones. This is similar to how I made my chili lime chicken and chipotle lime chicken. That’s the way go to with chicken thighs, trust me on that – deboned and skin-on!

This is a super easy skillet chicken recipe, but I finished it off with 1 minute broiling in the oven to give the chicken skin a little chars, which is an optional step. This creamy garlic chicken is delightful with some pasta, and they are done in about 20 minutes. Bon appetit!
CHICKEN SHAWARMA (MIDDLE EASTERN)
2:42 AM |
This Chicken Shawarma is off the charts for effort vs output. Just a handful of everyday spices, a splash of olive oil and squeeze of lemon transform into the most incredible flavour. It’s a sure-fire crowd pleaser for even the fussiest of eaters!
")
This is the next instalment in my “Arabian Feast” series! This is my “go to” main dish when I’m entertaining for large groups because whether you’re making it for 4 or 40, it takes 5 minutes to prepare the marinade for the chicken then I leave the men to take charge of the grill while I sip wine with the girls.
“The chicken takes 5 minutes to prepare, whether you are making it for 4 or 40.”
I have a theory that a lot of people love the flavours of Middle Eastern food but are not sure how to combine spices to achieve the aromatic flavour that is so unique to the region. It always surprises me when I make a Middle Eastern dish that I usually have most of the ingredients in my pantry and all I need is to get the fresh produce. But thinking it through, it makes sense because the spices that are most commonly used in Middle Eastern dishes are spices like coriander, cumin, cinnamon and paprika which are pantry essentials in most households (I think).
So I think Chicken Shawarma is a great example of Middle Eastern dish that showcases how a handful of everyday ingredients can be combined together for an incredible flavour that smells and tastes so exotic!
")
I can no longer find the blog from which I sourced the original recipe about 7 years or so ago. The original recipe required “Grill Seasoning” which differs depending on where you live (and even brand to brand) so I made adjustments to exclude it. That way the spice rub will produce a consistent flavour.
Because the chicken has so much flavour and if you use thigh fillets as I do, then it will be nice and juicy as well so you won’t need a sauce on the side. But I have provided a Yoghurt Sauce in the recipe which is my standard sauce I use for most Middle Eastern dishes I make.
I like to serve this with flatbreads and a simple salad (like this Shredded Red Cabbage Carrot Salad which is pictured). Usually I use the flatbreads to make wraps (DIY style – I lay it all out on a platter).
This recipe is part of an Arabian Feast I recently made. 7 dishes that took 1 hour to prepare – 3 starters, 2 meat dishes (including this Chicken Sharwarma ) plus 2 salads (including the red cabbage salad pictured). I’ll be doing a post on the menu soon but here’s a little preview for you!
")
Brownie in a MUG
1:30 AM |Brownie in a Mug
Print


Oh my. We’re doomed. My young friends Reilly and Alden just showed me how they make single serving brownies, in a mug, in a microwave. Takes 5 minutes.
We did experiment a bit. Turns out that you really should not use extra virgin olive oil for this recipe, it’s too strongly flavored. Corn oil or canola oil work best. A pinch of salt helps make the chocolate more chocolate-y. I’ve added some vanilla and a tiny bit of cinnamon; you could also add a speck of instant coffee to take it up a notch.

The brownie lacks for structure (no egg) but that’s okay because it’s contained by the mug. When it’s done, it’s HOT. Perfect for topping with a little vanilla ice cream or whipping cream. The trick is getting the cooking time right for your microwave. Every microwave oven model is different.
Our 1000 watt microwave cooked these brownies in a mug perfectly at a minute 40 seconds. If you have a stronger microwave it will likely take less time. Enjoy!
CINNAMON CREAM CHEESE COFFEE CAKE
1:13 AM |CINNAMON CREAM CHEESE COFFEE CAKE

How great is coffee cake? There aren’t that many cakes that can justifiably be eaten at any time of day. While we may not always need an excuse to eat cake for breakfast, it’s nice to do so with a tad less guilt sometimes.
This particular coffee cake is a slight twist on the traditional with the addition of a cream cheese swirl. All the things we love about coffee cake are still there — cinnamon, nuts, crumb topping. There just happens to be some cream cheese goodness swirled into it the delicate cake to take it to new levels of fabulousness.

Don’t be put off by the long-ish recipe. This is really far quicker and easier to put together than it appears. You will go through a lot of measuring spoons, bowls, and such, so make sure your dishwasher is ready for that. But, once you take a bite, you’ll know it was worth every dirty bowl
ICE CREAM SUNDAE COOKIE CUPS
12:24 AM |
Happy Monday to you! I’ve got a really fun and simple recipe to share with you today. We’ve had a stash of these Ice Cream Sundae Cookie Cups in the freezer which has been a really nice treat to enjoy after some pool time on a hot summer evening.
You use a standard sized muffin tin, and some chocolate chip cookie dough (minus the chocolate chips) to make the cookie cups. They are perfect for holding a little scoop of vanilla ice cream.

To make the little well in the center, I used a small spice container to press down the center right when them came out of the oven. Don’t worry if your cookie cup still looks a little under baked when you pull them out of the oven. This makes them easier to bite into when they are frozen later.


Kimchi Fried Rice
9:40 PM |

Kimchi Fried Rice
Kimchi Fried Rice – the easiest and best fried rice made with Korean kimchi. Spicy, flavorful and absolutely delicious. Dinner takes 15 mins.
Originally published in June 2011, updated with new photos.

My good friend J is a half Korean and she always makes homemade kimchi. Mr. Rasa Malaysia and I love kimchi and whenever J brings over her kimchi, I always make kimchi fried rice, which is easily one of the most delicious fried rice recipes ever!

Kimchi fried rice is a popular Korean recipe and it takes practically 15 minutes to make. It calls for a few basic ingredients: kimchi, overnight steamed rice, and egg. The egg is always fried separately and served on top of the kimchi fried rice but most of the time, I just love it plain with just kimchi and rice. It’s delicious as is, mouthwatering and appetizing.
As kimchi is somewhat wet, remember to squeeze the juice out of the kimchi before you make the fried rice. I like my fried rice toasty and somewhat dry, not wet. The reddish color and the pungent kimchi aromas beckon whenever I cook the dish. Dinner will always be good when I have a serving of kimchi fried rice. Serve it with spicy Korean chicken and you have a complete meal.
Code QC.txt Mở Hiển thị Code QC.txt.
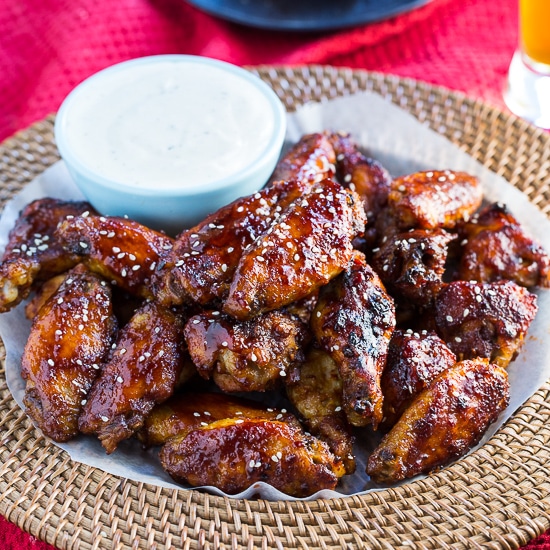
Crock Pot Sweet and Spicy Sticky Wings
3:53 AM |
These Crock Pot Sweet and Spicy Sticky Wings are super tender and are perfect for the upcoming big game. They develop that fall of the bone quality that meats cooked in the crock pot always do, making them really easy to eat. There’s no need to gnaw away at the bone for 5 minutes to get all the meat off.


You practically can’t have a football game without wings. They’re pretty much a necessity. But wings aren’t always as good as they could be. Sometimes they’re soggy or too greasy. Or even worse – rubbery.
Not these slow cooked wings. They have a wonderful texture that is tender and moist and an amazing sweet and spicy taste with lots of flavor from fresh ginger.

There are two parts to this recipe. First the wings are coated in a paste made from ginger, garlic, dark brown sugar, a little soy sauce and Sriracha sauce and cayenne pepper for heat. They are placed in the Crock Pot and cooked on LOW for 3 to 4 hours. Then all of the accumulated liquid is drained off. This really helps get rid of excess fat.

Once they have cooled they are coated in sauce, placed on a rack and put under the broiler until they start to get nicely browned. They are basted and flipped a few times to really get a nice coating.

The really cool thing about this recipe is once they are slow cooked, they can be refrigerated for 24 hours and then finished the next day.
Crock Pot Sweet and Spicy Sticky Wings
Recipe type: Appetizer
Ingredients
- 1 (2-inch) piece fresh ginger, peeled and chopped
- 4 garlic cloves, peeled and chopped
- ¾ cup packed dark brown sugar
- ¼ cup plus 1 tablespoon soy sauce
- 1 teaspoon Sriracha sauce, divided
- ¼ teaspoon cayenne pepper, divided
- 4 pounds chicken wings, halved at joint and wingtips removed
- ¼ cup water
- ¼ cup tomato paste
- sesame seeds, optional
Instructions
- Place ginger, garlic, ¼ cup dark brown sugar, 1 tablespoon soy sauce, ½ teaspoon Sriracha sauce, and ⅛ teaspoon cayenne pepper in a food processor and pulse until a paste is formed.
- Place chicken wings and paste in crock pot and toss to coat.
- Cover and cook on LOW for 3 to 4 hours. Use slotted spoon to remove wings and place them in a large bowl lined with paper towels. Discard liquid in crock pot.
- Let wings cool 20 minutes or you can refrigerate them up to 24 hours.
- Place oven rack in lower-middle of oven. It should be 10 to 12 inches from the heating element. Turn oven to BROIL.
- Set a wire rack inside a rimmed baking sheet and spray rack with cooking spray.
- In a medium bowl, whisk together water, tomato paste, remaining ½ cup dark brown sugar, ¼ cup soy sauce, ½ teaspoon Sriracha sauce, and ⅛ teaspoon cayenne pepper.
- Pour half of sauce in bowl with chicken wings and gently toss to coat. Place wings skin side up on prepared rack.
- Broil until wings are lightly charred, about 10 to 15 minutes. Flip wings over and brush with sauce. Broil 3 minutes. Flip and brush with sauce one more time and broil 2 minutes.
- Sprinkle with sesame seeds.
Notes
Broiling times are estimates. The chicken will already be cooked through so you are just broiling long enough to get a good, charred coating of sauce on the wings. Watch them carefully. If they are not charring, you may need to move the rack closer to the heating element.
It helps to drain chicken wings on a layer of paper towels when you remove them form the crock pot. They will caramelize better if excess liquid is removed.
It helps to drain chicken wings on a layer of paper towels when you remove them form the crock pot. They will caramelize better if excess liquid is removed.
Grab-n-Go Pancake Muffins: A Healthy Breakfast on the GO!
3:28 AM |
As much as we strive to gather around the table together for meals, there are times when our busy schedules keep us going in different directions. If it’s not busy school or work schedules, then it’s a variety of sports and other activities that keep us moving … and most likely you and your family as well!

Yet, even on busiest of mornings, there’s no need to compromise on good nutrition. Thankfully, there’s always time for a quick, healthy breakfast with these delicious and fun gluten-free “grab-n-go” pancake muffins.
These easy-to-make muffins are a new spin on my popular almond flour pancakes. So, they’re not only delicious, they’re chock-full of good nutrition too! That’s because they’re made with wholesome real food ingredients like blanched almond flour, which is a good source of protein and fiber.
Of course, my favorite part about this recipe is how easy these muffins are to make – just place the ingredients into your blender, give them a whirl, add some fresh berries and you’re ready to bake!
Plus these simply delicious muffins keep beautifully in the fridge, making breakfast even quicker since they can easily be reheated in just a matter of minutes!
Three cheers for an easy, delicious and healthy breakfast on the run!

This delightful recipe is just one of more than 100 irresistible grain-free, dairy-free recipes in my new cookbook – Everyday Grain-Free Baking!
From breads, biscuits and muffins to savory snacks and decadent treats, you’ll find step-by-step instructions, beautiful color photographs and helpful tips & tidbits to make all of your GF baking adventures a delicious success!

My mami frequently visit to see the secrets of cooking delicious.
Ingredients
- 1/3 cup plain whole milk or coconut milk yogurt
- 2 tablespoons unsalted butter (or coconut oil), melted
- 1 tablespoon honey (or maple syrup)
- 1 teaspoon pure vanilla extract
- 1/4 teaspoon apple cider vinegar
- 1 3/4 cups blanched almond flour
- 1/2 teaspoon baking soda
- 1/4 teaspoon sea salt
- 3 large eggs
- 1/4 cup diced strawberries
- 1/4 cup whole blueberries
Instructions
- Preheat oven to 350°F. Grease 8 muffin cups in a 12-cup muffin tin with coconut oil. Set aside.
- Place all of the liquid ingredients except the eggs into a blender or food processor. Then place all of the dry ingredients on top. Cover and blend on low 10–15 seconds just until well combined. (Batter will be thick.)
- Add the eggs and blend on low about 15–20 seconds, then increase to high and blend 20–30 seconds, just until eggs are incorporated into the batter. (Do not overmix or muffins will not be tender.)
- Transfer the muffin batter to a bowl and fold in the berries. Evenly divide the pancake muffin batter among the 8 lined muffin cups.
- Bake for 15–18 minutes, until slightly golden brown on top and a toothpick inserted into center comes out clean. Remove from oven and allow muffins to cool 2–3 minutes in the tin. Then run a knife around the edges of each cup and invert the pan over a sheet of parchment to remove.
Notes
These pancake muffins store well in the fridge for 3–4 days. To reheat, simply place in a 200°F oven for 3–5 minutes, until warm.