
Home » Archives for May 2016
Featured Posts
-
No matter what time of year, a warm bowl of Pho is always satisfying. Enjoy this gluten-free, plant-based version as a complete lunch or...
-
 3D stone blocks with nice effects will make anyone fascinated, even cause you could not bear to eat them. rong recently, sisters talk racin...
 -
 How to make pumpkin milk is easy, moreover this dish is also very tasty, nutritious, particularly effective for the body you have flavored a...
 -
Pretty small floating cakes, plump, pale and fragrant vegetarian cake are indispensable whenever the Cold Food Festival. Since long time...
-
 Because I made all these pizza at various times, you will see different pans and crusts. The Mediterranean one was delicious but mushy....
 -
Print Almond Poppy Seed Chicken Salad Sandwiches Yield: About 5 - 6 servings Ingredients Chicke...
-
I love that there is no cooking required with this recipe, (especially if you buy pre-cooked shrimp), which is so tempting when the tem...
-
A helpful infographic guide for moms about your baby’s weekly evolution alongside the changes taking place in your body during pregnancy. ...
-
 Steamed chicken with soy sauce is another dish quite simply bringing marinated chicken and steamed with soy sauce is a very attrac...
 -
 Bun cha noodle is one of the oldest favorites of north Vietnam cuisine. The ingenuity of the housewives will be expressed through a delic...
Pancake breakfast sausage rolls exciting
9:07 AM |Pancake breakfast sausage rolls exciting


To make pancakes and sausage rolls you need to prepare the following materials:


Read more…
Instruction:
To make pancakes and sausage rolls you need to prepare the following materials:
- 100g flour
- 200g of water
- 2 eggs
- Little salt
- 6-8 sausages
- 5 stalks green onion
- At roasted white sesame
- Mayonnaise (if applicable)
For flour and salt into a bowl at all, add water and stir to dissolve powder. Chopped scallions and flour into a bowl. To dough rest for 15 minutes.
Put 2 eggs into other cells, stirring eggs.
For little cooking oil in the pan, and fry the sausage until lightly browned butter.
For little cooking oil in the pan, evenly coated with oil covering the pan and ladle batter into the pan 1 patch, for the cake pans are coated covering the pan. To a small fire to the bread without burning, until the cake is golden brown steam shovel to flip the cake pan on the two surface are cooked..
Ladle about 2-3 tablespoons bread omelette face, shaking the pan for pancakes and eggs are covered. When the egg has dried, use the shovel to flip the eggs into the eggs are cooked.
When the cake is cooked, cutting board or plate for bread at large, the egg side down to the roll, the egg outside of the cake will look better. For the sausage on top, sprinkle with white sesame up, and if you like to add mayonnaise, roll back. Continue until the dough.
Use a knife to cut the bread into small pieces as you like, put the fork and use.
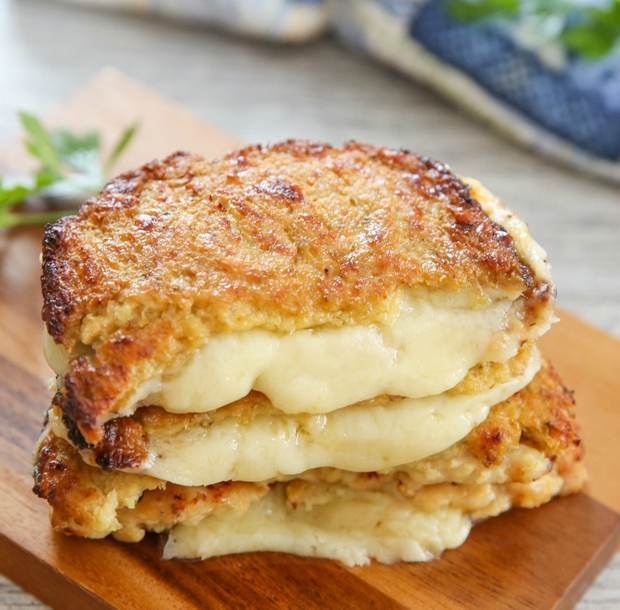
CAULIFLOWER CRUSTED GRILLED CHEESE SANDWICHES
8:56 AM |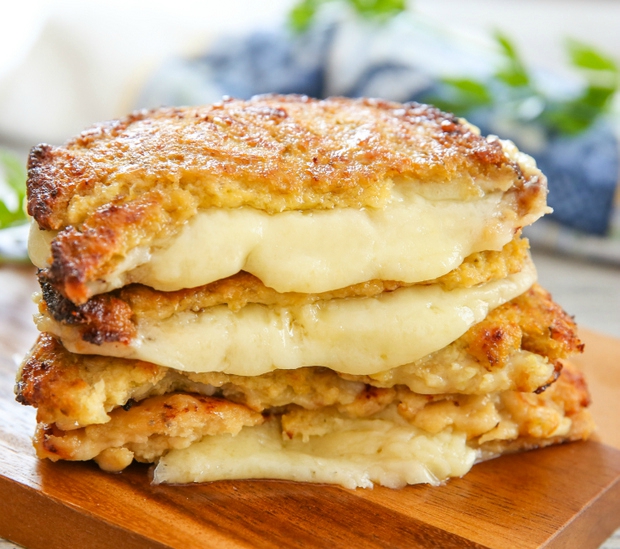 .
.
This is a great low carb solution that still allows you to enjoy a comforting grilled cheese sandwich.
Yes, we’re still eating a ton of cauliflower at home. We also eat a lot of grilled cheese sandwiches, so this combines the best of both worlds.

Mr. K and I have consumed a ridiculous amount of cheese this year, mainly from grilled cheese sandwiches and cauliflower creations. I didn’t realize how much cheese we were eating until I was rummaging through the fridge and realized we were down to our last bar of Cabot cheese. This is particularly alarming because in March, I won $150 worth of Cabot cheese in a raffle contest, half of which was shipped to me at the end of March and half to be shipped to me in October. We’re still two months away from October and I’m already almost completely out of my first shipment of cheese. Eeek.
It was worth using up some premium cheddar cheese on these sandwiches though. They are so flavorful and the cauliflower crust holds up rather well. I can’t claim credit for this genius creation. It came from The Iron You and he basically took the method for making cauliflower pizza crust or cauliflower breadsticks and made them into bread slices instead. I made some tweaks to the recipe and methodology and my adapted method is below.
STAY CONNECTED!
CAULIFLOWER CRUSTED GRILLED CHEESE SANDWICHES
YIELD: 2
INGREDIENTS:
- 1 head of cauliflower, cut into small florets and stem removed
- 1 large egg
- 1/2 cup shredded Parmesan cheese
- 1 tsp Italian herb seasoning
- 2 thick slices of white cheddar cheese
DIRECTIONS:
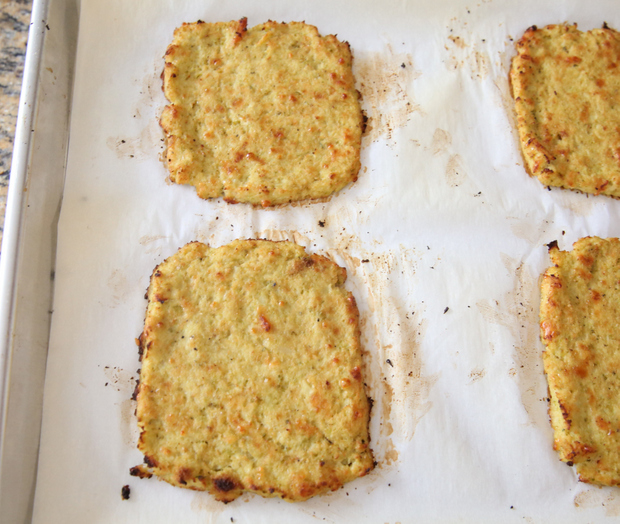
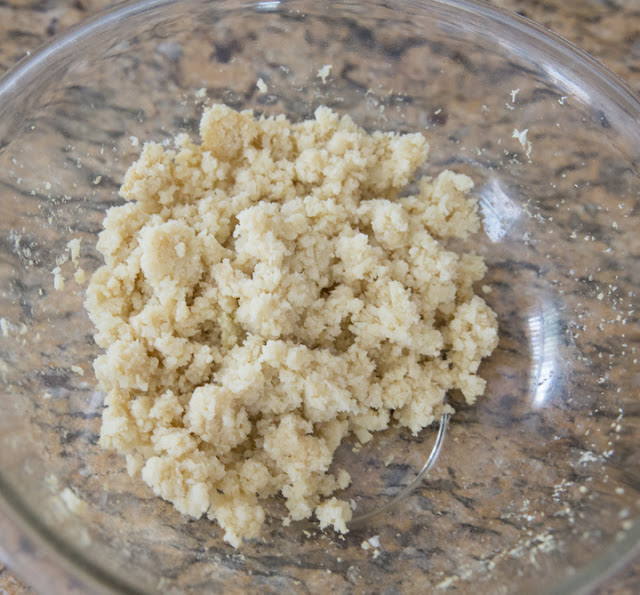
1. Preheat oven to 450F. Place cauliflower into food processor and pulse until crumbs about half the size of a grain of rice.
2. Place cauliflower into large microwave safe bowl and microwave for 2 minutes. Your cauliflower should be soft and tender (and hot!).
3. Stir cauliflower to mix up the bottom and top cauliflower. Place back into the microwave and cook for another 3 minutes. (If you don't want to use the microwave to dry out the cauliflower and prefer to steam and wring with a cloth to dry, check out my wringing instructions here.) Remove and stir again so that all the cauliflower cooks evenly. Place back into microwave and cook for 5 minutes. At this point, you should see the cauliflower is starting to become more dry. Microwave for another 5 minutes. Cauliflower should still be slightly moist to the touch, but should look dry and clumped up (like photo above; similar to as if someone had chewed it up and spit it back out.) If you've made cauliflower pizza or breadsticks with the cloth wringing dry method, it should look the same.
4. Add in egg, parmesan and seasoning. Stir to combine until smooth paste forms. Divide dough into 4 equal parts. Place onto large baking sheet lined with parchment paper or silpat mat. Using your knuckles and fingers, shape into square bread slices about 1/2 inch thick. Bake cauliflower bread for about 15-18 minutes or until golden brown. Remove from oven and let cool a few minutes.
5. Using a good spatula, carefully slide cauliflower bread off of parchment paper. Now you are ready to assemble your sandwiches. Normally I make grilled cheese sandwiches on a pan, but since the cauliflower crust is more delicate, I didn't want to risk it breaking with too many flips on the stove. Instead, make 2 cauliflower sandwiches by adding a slice of cheese in between each pair of bread slices. Place sandwiches into toaster oven and broil for several minutes (5-10) until cheese is completely melted and bread is toasty. If you don't own a toaster oven, you can also do this in the oven.
Clean Eating Creamy Sun-dried Tomato Chicken Recipe
8:38 AM |
This chicken recipe is for a creamy, clean eating chicken with sun-dried tomatoes and the chicken is tender and falls off the bones. This recipe is Paleo, gluten free, dairy-free and is good for a clean eating diet. It only takes 15 minutes to get started and then most of the cooking is done by your oven while you clean your kitchen, work, play or relax!
This chicken was amazing. The clean eating/dairy free aspect doesn't change the quality or taste whatsoever. So good. There is about 15-20 minutes of prep work, but after that it cooks in the oven and is fall off the bone tender.
Ingredients
- 1/4 C. Unmodified Potato Starch or Tapioca Starch or (Corn Starch if you don't eat Paleo)
- 1 T. Coarse Real Salt
- 1 t. Freshly Ground Pepper
- 8 Chicken thighs, bone-in, skin removed
- 3 T. Olive Oil, divided
- 1 Yellow Onion, Sliced thinly
- 3/4 C. Sliced Sun-dried Tomatoes (not packed in oil)
- 1 T. Garlic, minced
- 1 t. Italian Seasoning (oregano, thyme, parsley)
- Large Pinch Red Pepper Flakes
- 1 Can (13.5 oz.) Coconut Milk
- 1 C. Chicken Stock or Broth
- Basil, shredded, to top
Instructions
- Mix together the potato or tapioca starch, salt, and pepper in a medium sized bowl. Toss the chicken thighs in the mixture until fully coated.
- Heat 2 T. of the Olive Oil in a large oven-proof frying pan or ceramic coated dutch oven. Add the chicken, four pieces at a time, and brown on each side. When the chicken is all browned, remove it and set it aside.
- Add the remaining 1 T. of oil to the pan and heat to medium/high. Add the sliced onion and saute for 2 minutes. Add the sun-dried tomatoes, garlic, Italian Seasoning, and red pepper and saute for another 30 seconds.
- Add the coconut milk and chicken broth and bring to a boil.
- Add the chicken back into the sauce, scooping the onions and tomatoes over the top of the chicken. Try to fit the chicken in a single layer, if possible.
- Cover pan with a lid(make sure it is oven safe) and place it in the oven. Cook for 45 minutes at 400 degrees. After 45 minutes, reduce the heat to 300 and cook for another 20 minutes.
- Remove from the oven and top with shredded basil just before serving.
Soy sauce marinated fried chicken
6:04 AM |
Soy sauce marinated fried chicken
4 chicken leg original
Garlic, onion + white head of onion, ginger.
Cashews or turmeric.
Knorr seasoning, sugar, soy sauce, chili sauce,
chili garlic vinegar.
Cucumber, cherry
tomato, black mushrooms
* Step 1: you bring
shaved ginger washed and shredded bark.
* Chicken you washed
with water and then you just get crushed ginger 1/2 place chicken thighs close
up for flavor and rinse with clean water.
* Drain chicken
marinated chicken followed you with soup, seasoning salt, pepper and place
remaining ginger. You marinate the chicken for 30 minutes to infuse spices
offline.
* Step 2: You steaming
chicken thigh for nine and then pick out the drain then took her flour over
chicken for chicken rubbed dry completely, then you get a small bowl of barley,
soy sauce and lemon juice squeezed to Stir mixture, you rub the mixture on your
back rub your chicken dry basis 1.2 real chicken again for spices infuse
offline.
* Step 3: pan on the
stove to boil and let oil into frying and flush fat chicken until golden crispy
chicken, you have to drain the fat chick pick.
* Step 4: How to put
soy sauce chicken challenge: Garlic, pepper and minced garlic vinegar, soy
sauce and then put the sugar and a little water into the cold.
* Soy sauce to taste,
sweet and sour taste is. Finally Air little chutney on. Since its soy sauce to
the rice used to make up his chan light phase for severance
STEAMED CHICKEN soy sauce
5:51 AM |
Steamed chicken with soy sauce is another dish quite
simply bringing marinated chicken and steamed with soy sauce is a very
attractive dish with tender meat, taste profile for your family meals and
These
materials need to be prepared include:
- - 1 chicken about 1.3 kg .
- - 1 stalk ginger.
- - 30 ml of alcohol.
- - Soy sauce.
- - Spices: salt, sugar, seasoning salt.
How
to make chicken steamed soy sauce as follows:
- - The chicken to clean and dry wash
- - Ginger washed, sliced. Scallions washed first
partial cut white out. Peeled garlic, minced.
- - White stuffed onions and ginger header into
the chicken belly
- - Mix 6 tablespoons soy sauce with 1 tablespoon
sugar and minced garlic
-
Then, scan the soy sauce mixture over the
chicken all over themselves, to marinate for 30 minutes to infuse all spices.
-
After a marinade, the chicken in the
microwave for 2 minutes turned face again and bring the bumps will go steaming
chicken about 30 minutes for chicken is cooked by
- -Steamed chicken with soy sauce, soy sauce
steamed chicken. Quite simple .
-Tender chicken, soy sauce seasoning absorbed very tasty
and delicious.
Vietnamese BBQ Pulled Pork Banh Mi
8:43 AM |
Ever since I picked up a slow cooker, I have been addicted to pulled pork! The slow cooker turns out perfectly cooked pulled pork every time that is nice and juicy and tender. What's more is that it is dead easy to make pulled pork given that you can simply put the pork into the slow cooker in the morning and let it work its magic while you are at work. Recently I have been trying new flavours with BBQ pulled pork and while I was enjoying some Vietnamese caramel shrimp banh mi recently, I got the crazy idea to try a Vietnamese pulled pork banh mi.
The first step in creating the Vietnamese pulled pork banh mi was coming up with the 'BBQ' sauce. I particularly enjoy the Vietnamese savoury caramel sauce like the one used in Vietnamese caramel shrimp and I wanted to use that as the base of the BBQ sauce. From there I added some typical Vietnamese flavours including some salty fish sauce, some tart lime juice and some birds eye chilies for a kick of spicy heat. Once I had the BBQ sauce made it was a simple matter of throwing the pork into the slow cooker along with some of the BBQ sauce to cook while I went off to work.
Armed with my Vietnamese pulled pork it was a simple matter of making the banh mi sandwiches. Of course the next step was to make some quick Vietnamese carrot and radish pickles . From there I assembled the sandwiches with the pulled pork in a baguette with lots of fresh ingredients and a touch of mayonnaise. The Vietnamese pulled pork was amazingly tasty with an excellent balance of sweet, salty, tart, and spicy hot. The juicy cucumbers and pickles worked really well with the tasty BBQ pulled pork cleansing the palette leaving you ready to enjoy more of the BBQ pulled pork in the next bite.
Vietnamese BBQ Pulled Pork Banh Mi
Servings: 4
ingredients
- 1 baguette (cut into 4 sandwich sized lengths and sliced in half)
- 4 tablespoons mayonnaise
- 1 pound Vietnamese BBQ Pulled Pork (see below)
- 1/4 cup pickled daikon radish
- 1/4 cup pickled carrots
- 1/2 cup cucumber (thinly sliced)
- 1/2 cup cilantro (loosely packed)
- 2 birds eye chilies (sliced, optional)
directions
- Assemble sandwiches and enjoy.
Vietnamese BBQ Pulled Pork
Servings: 4
ingredients
- 1/4 cup sugar
- 1/4 cup water
- 1/4 cup fish sauce
- 1 lime (juice)
- 2 birds eye chilies (sliced)
- 1 (3 pound) pork butt
directions
- Heat the sugar in a pan on medium-high heat until it melts, caramelizes and turns a light golden brown.
- Carefully add the water and heat until the caramel dissolves.
- Add the fish sauce, lime juice and chilies and simmer to reduce by half, about 6-10 minutes.
- Put the pork in the slow cooker, pour 1/2 of the 'bbq' sauce over it and cook on low heat for 8 hours.
- Remove the pork from the slow cooker, let cool and then shred with a pair of forks.
- Skim the fat from the juices, place them in a sauce pan along with the remaining 'bbq' sauce, simmer to reduce to 1 cup and mix into the shredded pork.
Almond Poppy Seed Chicken Salad Sandwiches
8:38 AM |


Ingredients
- 1 1/4 lbs boneless skinless chicken breasts, cooked, chilled and diced into small cubes*
- 1 1/3 cups red grapes, halved
- 3/4 cup small diced celery
- 1/2 cup sliced almonds, toasted
- 1/3 cup chopped green onions (green portion only)
- 2/3 cup plain fat-free Greek yogurt (I used Fage for this since it has a thicker consistency)
- 1/4 cup light mayonnaise
- 2 Tbsp honey
- 1 Tbsp red wine vinegar
- 1 Tbsp poppy seeds
- 1 tsp dijon mustard
- 3/4 tsp salt, or to taste
Chicken Salad
Dressing
Directions
- For the dressing:
- Mix all dressing ingredients together in a medium bowl until well combined.
- For the salad:
- Add all chicken salad ingredients to a large mixing bowl or a salad bowl. Add dressing and toss to evenly coat. Store in refrigerator. Serve within 1 - 2 hours for best results (it's still good for another day but the almonds soften a little and the grapes juices run into the dressing).
- *To cook the chicken, I lined a rimmed baking sheet with foil. I pounded chicken to an even thickness and brushed both sides of the chicken lightly with olive oil and seasoned with salt and pepper and roasted in a preheated 425 degree oven until center registered 165 (this will take anywhere from 15 - 25 minutes depending on thickness of chicken breasts). Then let chill through in the fridge.
- Recipe source: Cooking Classy
QUINOA CRUST FOR PIZZA OR CHEESY GARLIC BREAD
8:45 AM |
There is a misconception that gluten free = healthy. That simply isn’t true. Especially when it comes to processed, pre-packaged gluten free products. These products often contain other fillers to take the place of gluten. I only recommend following a gluten free diet if you have a medical condition that requires it. Having said that, there are many people who do need to avoid gluten, mostly due to allergies and intolerances.
Common foods like pizza and garlic bread are not allowed in a gluten free diet due to the wheat in the dough. So, I came up with a gluten free quinoa crust that could be used for pizza or cheesy garlic ‘bread’.
To make this quinoa crust, start by rinsing the uncooked quinoa in a fine mesh strainer. This will wash away some of the powdery residue that often tastes a little bitter. Then, let the quinoa simmer in a little olive oil in a stock pot to develop a toasty flavor. Once toasted, add water to the pot, cover, and simmer until cooked.
Once the quinoa is cooked, remove the lid and continue to cook it over low heat for another five minutes. This will evaporate any excess moisture, preventing a soggy crust.
Transfer the quinoa to a large bowl and let it cool for 10 minutes.
 In a separate bowl, whisk together some eggs, olive oil, garlic salt, dried oregano, dried basil, and baking powder. The baking powder will start to react as soon as it is added to this mixture. So, don’t mix these ingredients until you are prepared to make the dough.
Once the quinoa has cooled, stir in some shredded Italian-blend cheese. Then, add the egg mixture and stir to combine.

Line a baking sheet with parchment paper and spray it with cooking spray. Pour the dough onto the parchment.

Use your hands to spread the dough into an even, 1/4 inch layer. You could form it into a circle if you want to make pizza. I made garlic bread. So, I spread the dough into a 10 x 7 inch rectangle.

Put the dough into a preheated 425 degree oven for 18-20 minutes. The edges should turn golden brown. Add whatever toppings you like. Then, return it to the oven for 5 minutes.
To make cheesy garlic bread, I added 1/2 cup shredded Italian-blend cheese to the crust. Then, served it with pizza sauce for dipping.
You could also top the crust with pizza sauce, shredded cheese, and your favorite pizza toppings.

Let your pizza, or garlic bread, cool for at least five minutes before slicing.

QUINOA CRUST FOR PIZZA OR CHEESY GARLIC 'BREAD' RECIPE
PREP TIME
COOK TIME
TOTAL TIME
Author: Amanda Finks
INGREDIENTS
- ½ cup quinoa
- 3 tsp. olive oil, divided
- 1 cup water
- 2 large eggs
- 1 ½ tsp. garlic salt
- ½ tsp. dried oregano leaves
- ½ tsp. dried basil leaves
- ½ tsp baking powder
- ¼ cup shredded Italian-blend cheese (pizza-blend or mozzarella would be good too)
- Optional - For cheesy garlic bread: ½ cup shredded Italian-blend cheese and pizza sauce for dipping
- Optional - For pizza: ⅓ cup pizza sauce, ½ cup shredded Italian-blend cheese, and your favorite pizza toppings
INSTRUCTIONS
- Place the uncooked quinoa into a fine mesh strainer and run under cool water for about a minute until water runs clear. Shake off as much excess liquid as possible. Add the rinsed quinoa and 2 tsp. olive oil to a medium sauce pot. Turn the heat to medium high and stir occasionally for 6-7 minutes. The excess moisture will evaporate and the quinoa will begin to toast.
- Carefully add the water to the toasted quinoa and cover. Bring to a boil then reduce to a simmer. Let the quinoa cook for about 15 minutes, stirring occasionally. Remove the lid and turn the heat to low. Cook 5 more minutes, stirring occasionally (evaporating excess moisture). Transfer the cooked quinoa to a large bowl and let it cool for at least 10 minutes.
- Preheat oven to 425 degrees F. Line a baking sheet with parchment paper and spray with cooking spray.
- In a small bowl, add the eggs, 1 tsp. olive oil, garlic salt, oregano, basil, and baking powder. Whisk until well combined.
- Add the cheese to the quinoa. Stir to combine. Add the egg mixture to the quinoa. Stir until well combined.
- Spread the quinoa dough into a ¼ inch, even layer on the parchment paper. I made cheesy bread sticks so I made a 10 x 7 inch rectangle. Bake for 18-20 minutes, edges should begin to brown.
- Top with the pizza, or garlic bread, toppings and return to the oven for 5 minutes.
- Let the pizza, or garlic bread, cool for 5 minutes before slicing.
NUTRITION INFORMATION
Serving size: ¼ of the crust Calories: 169 Fat: 8.8 Saturated fat: 2.3 Carbohydrates: 14.9Fiber: 1.7 Protein: 7.4