
Featured Posts
-
No matter what time of year, a warm bowl of Pho is always satisfying. Enjoy this gluten-free, plant-based version as a complete lunch or...
-
 3D stone blocks with nice effects will make anyone fascinated, even cause you could not bear to eat them. rong recently, sisters talk racin...
-
 How to make pumpkin milk is easy, moreover this dish is also very tasty, nutritious, particularly effective for the body you have flavored a...
-
Pretty small floating cakes, plump, pale and fragrant vegetarian cake are indispensable whenever the Cold Food Festival. Since long time...
-
 Because I made all these pizza at various times, you will see different pans and crusts. The Mediterranean one was delicious but mushy....
-
Print Almond Poppy Seed Chicken Salad Sandwiches Yield: About 5 - 6 servings Ingredients Chicke...
-
I love that there is no cooking required with this recipe, (especially if you buy pre-cooked shrimp), which is so tempting when the tem...
-
A helpful infographic guide for moms about your baby’s weekly evolution alongside the changes taking place in your body during pregnancy. ...
-
 Steamed chicken with soy sauce is another dish quite simply bringing marinated chicken and steamed with soy sauce is a very attrac...
-
 Bun cha noodle is one of the oldest favorites of north Vietnam cuisine. The ingenuity of the housewives will be expressed through a delic...
ICE CREAM SUNDAE COOKIE CUPS
12:24 AM |
Happy Monday to you! I’ve got a really fun and simple recipe to share with you today. We’ve had a stash of these Ice Cream Sundae Cookie Cups in the freezer which has been a really nice treat to enjoy after some pool time on a hot summer evening.
You use a standard sized muffin tin, and some chocolate chip cookie dough (minus the chocolate chips) to make the cookie cups. They are perfect for holding a little scoop of vanilla ice cream.

To make the little well in the center, I used a small spice container to press down the center right when them came out of the oven. Don’t worry if your cookie cup still looks a little under baked when you pull them out of the oven. This makes them easier to bite into when they are frozen later.


Kimchi Fried Rice
9:40 PM |

Kimchi Fried Rice
Kimchi Fried Rice – the easiest and best fried rice made with Korean kimchi. Spicy, flavorful and absolutely delicious. Dinner takes 15 mins.
Originally published in June 2011, updated with new photos.

My good friend J is a half Korean and she always makes homemade kimchi. Mr. Rasa Malaysia and I love kimchi and whenever J brings over her kimchi, I always make kimchi fried rice, which is easily one of the most delicious fried rice recipes ever!

Kimchi fried rice is a popular Korean recipe and it takes practically 15 minutes to make. It calls for a few basic ingredients: kimchi, overnight steamed rice, and egg. The egg is always fried separately and served on top of the kimchi fried rice but most of the time, I just love it plain with just kimchi and rice. It’s delicious as is, mouthwatering and appetizing.
As kimchi is somewhat wet, remember to squeeze the juice out of the kimchi before you make the fried rice. I like my fried rice toasty and somewhat dry, not wet. The reddish color and the pungent kimchi aromas beckon whenever I cook the dish. Dinner will always be good when I have a serving of kimchi fried rice. Serve it with spicy Korean chicken and you have a complete meal.
Code QC.txt Mở Hiển thị Code QC.txt.
Crock Pot Sweet and Spicy Sticky Wings
3:53 AM |
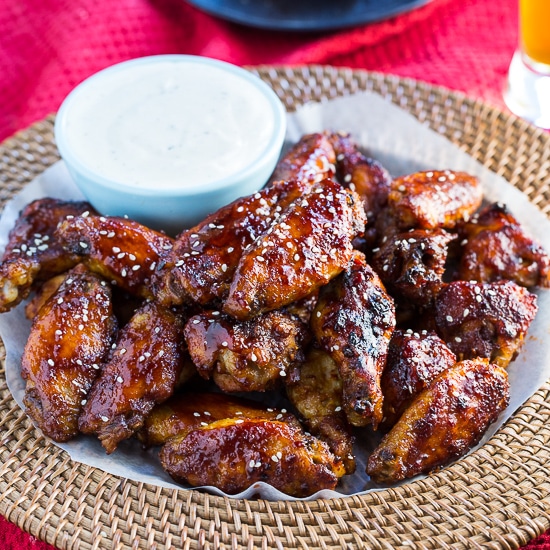
These Crock Pot Sweet and Spicy Sticky Wings are super tender and are perfect for the upcoming big game. They develop that fall of the bone quality that meats cooked in the crock pot always do, making them really easy to eat. There’s no need to gnaw away at the bone for 5 minutes to get all the meat off.


You practically can’t have a football game without wings. They’re pretty much a necessity. But wings aren’t always as good as they could be. Sometimes they’re soggy or too greasy. Or even worse – rubbery.
Not these slow cooked wings. They have a wonderful texture that is tender and moist and an amazing sweet and spicy taste with lots of flavor from fresh ginger.

There are two parts to this recipe. First the wings are coated in a paste made from ginger, garlic, dark brown sugar, a little soy sauce and Sriracha sauce and cayenne pepper for heat. They are placed in the Crock Pot and cooked on LOW for 3 to 4 hours. Then all of the accumulated liquid is drained off. This really helps get rid of excess fat.
Once they have cooled they are coated in sauce, placed on a rack and put under the broiler until they start to get nicely browned. They are basted and flipped a few times to really get a nice coating.

The really cool thing about this recipe is once they are slow cooked, they can be refrigerated for 24 hours and then finished the next day.
Crock Pot Sweet and Spicy Sticky Wings
Recipe type: Appetizer
Ingredients
- 1 (2-inch) piece fresh ginger, peeled and chopped
- 4 garlic cloves, peeled and chopped
- ¾ cup packed dark brown sugar
- ¼ cup plus 1 tablespoon soy sauce
- 1 teaspoon Sriracha sauce, divided
- ¼ teaspoon cayenne pepper, divided
- 4 pounds chicken wings, halved at joint and wingtips removed
- ¼ cup water
- ¼ cup tomato paste
- sesame seeds, optional
Instructions
- Place ginger, garlic, ¼ cup dark brown sugar, 1 tablespoon soy sauce, ½ teaspoon Sriracha sauce, and ⅛ teaspoon cayenne pepper in a food processor and pulse until a paste is formed.
- Place chicken wings and paste in crock pot and toss to coat.
- Cover and cook on LOW for 3 to 4 hours. Use slotted spoon to remove wings and place them in a large bowl lined with paper towels. Discard liquid in crock pot.
- Let wings cool 20 minutes or you can refrigerate them up to 24 hours.
- Place oven rack in lower-middle of oven. It should be 10 to 12 inches from the heating element. Turn oven to BROIL.
- Set a wire rack inside a rimmed baking sheet and spray rack with cooking spray.
- In a medium bowl, whisk together water, tomato paste, remaining ½ cup dark brown sugar, ¼ cup soy sauce, ½ teaspoon Sriracha sauce, and ⅛ teaspoon cayenne pepper.
- Pour half of sauce in bowl with chicken wings and gently toss to coat. Place wings skin side up on prepared rack.
- Broil until wings are lightly charred, about 10 to 15 minutes. Flip wings over and brush with sauce. Broil 3 minutes. Flip and brush with sauce one more time and broil 2 minutes.
- Sprinkle with sesame seeds.
Notes
Broiling times are estimates. The chicken will already be cooked through so you are just broiling long enough to get a good, charred coating of sauce on the wings. Watch them carefully. If they are not charring, you may need to move the rack closer to the heating element.
It helps to drain chicken wings on a layer of paper towels when you remove them form the crock pot. They will caramelize better if excess liquid is removed.
It helps to drain chicken wings on a layer of paper towels when you remove them form the crock pot. They will caramelize better if excess liquid is removed.
Grab-n-Go Pancake Muffins: A Healthy Breakfast on the GO!
3:28 AM |
As much as we strive to gather around the table together for meals, there are times when our busy schedules keep us going in different directions. If it’s not busy school or work schedules, then it’s a variety of sports and other activities that keep us moving … and most likely you and your family as well!

Yet, even on busiest of mornings, there’s no need to compromise on good nutrition. Thankfully, there’s always time for a quick, healthy breakfast with these delicious and fun gluten-free “grab-n-go” pancake muffins.
These easy-to-make muffins are a new spin on my popular almond flour pancakes. So, they’re not only delicious, they’re chock-full of good nutrition too! That’s because they’re made with wholesome real food ingredients like blanched almond flour, which is a good source of protein and fiber.
Of course, my favorite part about this recipe is how easy these muffins are to make – just place the ingredients into your blender, give them a whirl, add some fresh berries and you’re ready to bake!
Plus these simply delicious muffins keep beautifully in the fridge, making breakfast even quicker since they can easily be reheated in just a matter of minutes!
Three cheers for an easy, delicious and healthy breakfast on the run!

This delightful recipe is just one of more than 100 irresistible grain-free, dairy-free recipes in my new cookbook – Everyday Grain-Free Baking!
From breads, biscuits and muffins to savory snacks and decadent treats, you’ll find step-by-step instructions, beautiful color photographs and helpful tips & tidbits to make all of your GF baking adventures a delicious success!

My mami frequently visit to see the secrets of cooking delicious.
Ingredients
- 1/3 cup plain whole milk or coconut milk yogurt
- 2 tablespoons unsalted butter (or coconut oil), melted
- 1 tablespoon honey (or maple syrup)
- 1 teaspoon pure vanilla extract
- 1/4 teaspoon apple cider vinegar
- 1 3/4 cups blanched almond flour
- 1/2 teaspoon baking soda
- 1/4 teaspoon sea salt
- 3 large eggs
- 1/4 cup diced strawberries
- 1/4 cup whole blueberries
Instructions
- Preheat oven to 350°F. Grease 8 muffin cups in a 12-cup muffin tin with coconut oil. Set aside.
- Place all of the liquid ingredients except the eggs into a blender or food processor. Then place all of the dry ingredients on top. Cover and blend on low 10–15 seconds just until well combined. (Batter will be thick.)
- Add the eggs and blend on low about 15–20 seconds, then increase to high and blend 20–30 seconds, just until eggs are incorporated into the batter. (Do not overmix or muffins will not be tender.)
- Transfer the muffin batter to a bowl and fold in the berries. Evenly divide the pancake muffin batter among the 8 lined muffin cups.
- Bake for 15–18 minutes, until slightly golden brown on top and a toothpick inserted into center comes out clean. Remove from oven and allow muffins to cool 2–3 minutes in the tin. Then run a knife around the edges of each cup and invert the pan over a sheet of parchment to remove.
Notes
These pancake muffins store well in the fridge for 3–4 days. To reheat, simply place in a 200°F oven for 3–5 minutes, until warm.
How to make delicious simple flour bewitching
2:45 AM |Fried flour cakes simplicity will get you immediately nutritious breakfast. Also, with the way this whole wheat bread, you can use in each meal or snack when hungry are. Although made from these materials are very rustic, simple as flour, eggs, sugar ... but the cake flour retains its own flavor. How to make bread is quite simple, with cakes using this you can make breakfast for the family, or do to bring your baby to go to school, or brought to the office to sip on an empty stomach is also jog!

If you do not know how to make the flour , then apply the formula below.

Get a separate bowl, milk, eggs, melted butter or vegetable oil in and mix to dissolve raw materials.
Pour this into the other two bowls and stir well, hands (can use a whisk to stir). Mix the flour until the dough plastic, the material absorbed. Use your fingers to touch the test if dough is not sticky anymore discrete or finished stitching means mixing flour to make bread I got you.

Step 2: If your oven has heated oven just before baking flour. However, if no oven, you can make bread in the pan well. How to do the following:
Place the pan on a cooking stove at the dry pan and place in boiling oil and butter until the butter melts, then ladle the mixture just mixing pancake batter into the pan. Note down real slowly to form the pie and avoid being spread around pan. Do the same with the other cake, pour the batter apart attention to the cake flour from sticking to each other offline!


Step 3: Wait until the wheel starts to turn yellow, you use chopsticks slightly to the back. Continue to fry until both sides are browned as is. Note when making bread, you should only whiff medium heat, if too high heat will cause loss of appetite singed bread while being "in life beyond nine".
After ripening wheat bread, you take-out available disk oil blotting paper to absorb the oil goes, excess butter. Finally the "repertoire" aromatic taste aromatic cake today. For this cake is served with, you can use chili sauce or ketchup. However using homemade chili sauce will taste better really, because the family has good taste, and ensure safety.


Step 4: How to make fried bread is a suggestion for those she loved baking , cooking slaughterhouse. These days you can spare a noodle cakes for a snack, or 1 week 2-3 times to do for the whole family for breakfast.
After frying, the cake will have a beautiful yellow color, with scents of butter, hot food is always the "good end of miscarriage". Also, when making bread, delicious cakes and want to relax, you can sprinkle a little cinnamon offline!
See also several types of bread made from wheat flour:

Wish you successful baking flour offline!
Read more…

Instructions on how delicious bread at home
Raw materials should be prepared
To make bread, you need:- 2 tablespoons of baking flour
- 1 tablespoon vegetable oil or butter
- 2 eggs
- 1 teaspoon baking powder - Salt, sugar

Ingredients to make bread at home
How to make bread
Step 1: How bread is easy, first you for flour in a large bowl, add baking powder, a pinch of salt and sugar mixed together. Mix until smooth puree is.Get a separate bowl, milk, eggs, melted butter or vegetable oil in and mix to dissolve raw materials.
Pour this into the other two bowls and stir well, hands (can use a whisk to stir). Mix the flour until the dough plastic, the material absorbed. Use your fingers to touch the test if dough is not sticky anymore discrete or finished stitching means mixing flour to make bread I got you.

Mix the ingredients for the cake flour together
Place the pan on a cooking stove at the dry pan and place in boiling oil and butter until the butter melts, then ladle the mixture just mixing pancake batter into the pan. Note down real slowly to form the pie and avoid being spread around pan. Do the same with the other cake, pour the batter apart attention to the cake flour from sticking to each other offline!

Use measuring flour salt

Flour scoop poured slowly into baking pan to prepare flour
After ripening wheat bread, you take-out available disk oil blotting paper to absorb the oil goes, excess butter. Finally the "repertoire" aromatic taste aromatic cake today. For this cake is served with, you can use chili sauce or ketchup. However using homemade chili sauce will taste better really, because the family has good taste, and ensure safety.

When starting nine yellow cake on the one hand ...

.... Then turned the rest of the cake and fried. In this way the cake flour, fried small fire should not burn cake
After frying, the cake will have a beautiful yellow color, with scents of butter, hot food is always the "good end of miscarriage". Also, when making bread, delicious cakes and want to relax, you can sprinkle a little cinnamon offline!
See also several types of bread made from wheat flour:

Flour cakes simple, easy to follow will be the breakfast items for the whole family
How to make pumpkin milk help thin people gain weight quickly
2:36 AM |How to make pumpkin milk is easy, moreover this dish is also very tasty, nutritious, particularly effective for the body you have flavored and are looking to improve their weight.
While many girls feel afraid for her cellulite body shall also have to figure out who the next hundred thousand methods to gain weight . With milk pumpkin how simple below, you will be soon be a snack and effective weight again and inexpensive.


Step 2: You bring the pumpkin cut into pieces about 2cm square shaped chess pieces.


Step 5: For 2 bags of milk and half a can of condensed milk and coconut milk 200ml machine, blender, along with Pumpkin. Coconut milk helps dairy dish more fragrant pumpkin patch day, if not like, then you can ignore offline.


How to gain weight with pumpkin Milk: Every day, you drink milk 2 cups pumpkin at noon, after dinner and before bed at night. Besides, you also need to combine eating 3 meals a day full (do not give up breakfast) and exercise to improve health and easily gain weight.
Note that, the milk is not medicine pumpkin weight gain should have no immediate effect, but to have the time. You should drink regularly and perseverance, beautiful design helps to brighten the skin by the pumpkin has many vitamins there.
In doing pumpkin milk above, hopefully, you'll get a fuller body, stronger.
Read more…
While many girls feel afraid for her cellulite body shall also have to figure out who the next hundred thousand methods to gain weight . With milk pumpkin how simple below, you will be soon be a snack and effective weight again and inexpensive.

Milk pumpkin
Pumpkin milk ingredients
- Pumpkin: 2kg, you should select the type of pumpkin gourd because very supple, sweet, aromatic back again.
- Fresh milk: 2 bags, you can use milk or sugar-sweetened are.
- Condensed milk: half pints, his life milk, or milk Dutch girl is the star of the south.
- Coconut milk: 200ml.
How to make pumpkin milk
Step 1: Pumpkin peeling the shell provides, and rinse with water, drain.
How to make pumpkin milk
Step 2: You bring the pumpkin cut into pieces about 2cm square shaped chess pieces.

Cut the pumpkin into small pieces before steaming
Step 3: Then, for a little pumpkin with salt in the pot steamed. To save time, you can let the pumpkin into cooked rice cooker. Absolutely no pumpkin boiled down as the milk will spoil pumpkin dishes there.
How to make pumpkin milk to gain weight
Step 4: Then you give the pumpkin in a blender grind smooth puree. In the absence of a blender, you can use a spatula to beam crushed pumpkin out offline. Should the hot pumpkin beams should be easier.Step 5: For 2 bags of milk and half a can of condensed milk and coconut milk 200ml machine, blender, along with Pumpkin. Coconut milk helps dairy dish more fragrant pumpkin patch day, if not like, then you can ignore offline.

Add the milk, condensed milk in pumpkin
Step 6: Pour the milk mixture into the pumpkin + a large pot, put on the stove, stirring just until boiling, then north to boiling. When completely cooled pumpkin milk, plastic bottles you entered and stored in the refrigerator compartment to drink cool gradually.
Milk cooked pumpkin
That's it then that, let's enjoy the finished product that you have just completed offline!
Delicious pumpkin scented milk nutritious
How to gain weight with pumpkin Milk: Every day, you drink milk 2 cups pumpkin at noon, after dinner and before bed at night. Besides, you also need to combine eating 3 meals a day full (do not give up breakfast) and exercise to improve health and easily gain weight.
Note that, the milk is not medicine pumpkin weight gain should have no immediate effect, but to have the time. You should drink regularly and perseverance, beautiful design helps to brighten the skin by the pumpkin has many vitamins there.
In doing pumpkin milk above, hopefully, you'll get a fuller body, stronger.
How to make beautiful 3d jelly from straw
4:38 AM |3D stone blocks with nice effects will make anyone fascinated, even cause you could not bear to eat them.
rong recently, sisters talk racing and how fossil hunt 3D shapes with vivid, eye-catching. Product looks complicated, it seems like that but actually doing this 3d jelly style is not too difficult. Here, you let my mami right ingredients prepared to embark on this fossil learn how to do.


Step 2: After doing part quartz in, the next step in doing this is to share agar agar 3d color follow these steps:

Step 3: The next step in doing this is to conduct agar agar pump section section jelly color inside the already crowded. Pumping also very simply, first of all, you cut off a frozen spoon (not too deep) in the middle of gypsum blocks in order to control the spread of the petals during pumping color.

Then you suck jelly color on the needles winter yet, oblique cross section into the hole nozzle needle into jelly and jam and jelly color gently pumped into the quartz blocks to form the serrated petals.

To create petals and pistils are within the plaster was cut holes, you can use the slightly oblique nozzle segment several times to share color jelly flows in cracks offline.

Step 4: In addition to creating petals and stamen 3d, you can also add the line pumping milk jelly color as shown below by using needles to inject directly. Also use absorbent paper to remove the colored jelly ejected before it curdle offline.

Step 5: If you do not want to waste the remaining portion colored plaster, then you can pour them into the holes were carved plaster to cover the hole and making plaster block becomes fuller.

Once completed, you upturned jelly block is already finished doing this stunning 3d plaster and know. And it's time to admire your finished I got you.

It was surprising how simple the syringe and needles from, you can manually make the agar block with more vivid 3d color like this. The smooth and slightly sweet taste of jelly cool bar will make anyone feel excited every time enjoy. Do not hesitate any longer, but you do not learn now how to do this 3d plaster to treat the whole family to flourish in the weekends or special days.
Wish you success with making 3D jelly just shared my mami.
Read more…
rong recently, sisters talk racing and how fossil hunt 3D shapes with vivid, eye-catching. Product looks complicated, it seems like that but actually doing this 3d jelly style is not too difficult. Here, you let my mami right ingredients prepared to embark on this fossil learn how to do.

3d making jelly from straws bring nice effects
Raw materials for making jelly 3D
- Fossil raw materials component in powder jelly (5 grams), sugar (100 grams) and water (800 ml).
- Raw as part flower jelly powder jelly (3 grams), sugar-free milk (400 ml) or replace it with coconut milk, condensed milk (80 ml) or replace it with sugar (70 grams), water ( 100 ml) and the type of food colors (blue, pink, red, orange, purple ...) to create flowers, leaves.
- Some instruments, such as the nozzle 1 (cut to length 2.5 cm, creating sharp 1 head) and one needle.

Raw materials used to make jelly 3d
How to make 3D spectacular fossil
Step 1: To make doing this 3d jelly, first of all, you need to do in the previous section under the plaster simple steps:- You for all the materials in the fossil section includes roads, water and seaweed powder in a clean pot. Then boil the pot on the stove at medium heat, stirring just boil stirring constantly until melted materials and mixture becomes translucent, then remove from the heat.
- The solution after the module to cool a little, then, you throw away the air bubbles scoop, pour the solution into plaster molds made with your favorite shapes and cool in the refrigerator to prevent parts of the hardened plaster offline.

Block after the hardened plaster of cool refrigerator compartment
Step 2: After doing part quartz in, the next step in doing this is to share agar agar 3d color follow these steps:
- Pour the vegetable mixture and water into a pot, boil on the stove at medium heat. In the process of boiling, you remember stir well until the powder dissolves and seaweed mixture becomes translucent.
- Next, you add milk and sugar to the milk and continue to cook and stir for another 30 seconds again, then remove from the heat.
- You Portion jelly water after boiling it out each small cup small cup every 1-2 drops of color (maybe little more if you like darker), is a small note on each glass of a different color. Then, you put the glass of colored jelly into hot water to jelly bowl from freezing before pumping to create floral offline.

Jelly cups mixed in different colors, soak in a bowl of warm water to jelly from freezing
Step 3: The next step in doing this is to conduct agar agar pump section section jelly color inside the already crowded. Pumping also very simply, first of all, you cut off a frozen spoon (not too deep) in the middle of gypsum blocks in order to control the spread of the petals during pumping color.

Shallow spoon made a hole in the center of the agar block after winter

Slanting straws to block passage through the hole agar agar were cut

Needles into wedges on the stretch gentle suction and pumping colored jelly in the interstices
Step 4: In addition to creating petals and stamen 3d, you can also add the line pumping milk jelly color as shown below by using needles to inject directly. Also use absorbent paper to remove the colored jelly ejected before it curdle offline.

Syringe needle directly into the milk agar agar block through holes were carved plaster

Pour jelly color balance section to seal holes were carved jelly
Once completed, you upturned jelly block is already finished doing this stunning 3d plaster and know. And it's time to admire your finished I got you.

Wait gelatin is completely turned upside agar block again
It was surprising how simple the syringe and needles from, you can manually make the agar block with more vivid 3d color like this. The smooth and slightly sweet taste of jelly cool bar will make anyone feel excited every time enjoy. Do not hesitate any longer, but you do not learn now how to do this 3d plaster to treat the whole family to flourish in the weekends or special days.
Wish you success with making 3D jelly just shared my mami.


